Pruning and Shaping Techniques for Rosa Glauca

Rosa glauca, also known as the red-leaved rose or wild rose, is a species appreciated for its unique bluish-green foliage and delicate pink flowers. Proper pruning and shaping techniques are essential to maintain the health, aesthetics, and vitality of Rosa glauca. This guide explores the best practices for pruning and shaping this remarkable rose species, ensuring it thrives in your garden while enhancing its natural beauty.
#### Understanding Rosa Glauca
**Botanical Characteristics**:
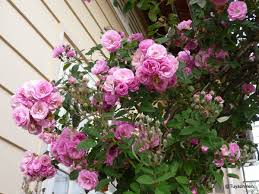
Rosa glauca is a deciduous shrub that typically reaches heights of 6-8 feet (1.8-2.4 meters) with a similar spread. Its stems are reddish and slightly thorny, with bluish-green leaves that have a distinct waxy coating. The flowers are small, pink, and single-petaled, blooming in late spring to early summer. In autumn, the plant produces bright red hips that add seasonal interest and provide food for wildlife.
**Growth Habit**:
Understanding the growth habit of Rosa glauca is crucial for effective pruning and shaping. This species tends to grow upright with arching canes. It is a vigorous grower, which means it can quickly become dense and overgrown if not properly managed. Regular pruning helps maintain an open structure, promoting air circulation and reducing the risk of diseases.
#### The Importance of Pruning
**Health and Vigor**:
Pruning is essential for maintaining the health and vigor of Rosa glauca. Removing dead, diseased, or damaged wood prevents the spread of diseases and pests, while also encouraging the plant to produce new, healthy growth. Proper pruning techniques can improve air circulation and light penetration, reducing the likelihood of fungal infections and promoting overall plant health.
**Aesthetic Appeal**:
Regular pruning and shaping enhance the aesthetic appeal of Rosa glauca. By controlling its size and shape, you can create a more attractive and manageable shrub that complements your garden design. Pruning also encourages the production of more flowers and hips, adding to the plant’s ornamental value.
**Flower and Fruit Production**:
Pruning stimulates the production of flowers and fruits. By removing old and unproductive canes, you direct the plant’s energy towards new growth and flowering. This results in a more abundant display of blooms and hips, enhancing the visual interest and ecological benefits of Rosa glauca.
#### Tools and Equipment
**Essential Tools**:
To effectively prune and shape Rosa glauca, you need a set of essential tools:
– **Bypass Pruners**: Ideal for cutting smaller stems and branches. They provide clean cuts without crushing the wood.
– **Loppers**: Useful for cutting thicker branches and canes. They provide greater leverage and reach.
– **Pruning Saw**: Necessary for cutting large, woody stems that are too thick for pruners or loppers.
– **Gloves**: Protect your hands from thorns and sharp edges.
– **Disinfectant**: To sterilize your tools between cuts, preventing the spread of diseases.
**Maintenance of Tools**:
Regular maintenance of your pruning tools ensures they remain sharp and effective. Clean your tools after each use, removing any sap or debris. Sharpen blades regularly to ensure clean cuts, and disinfect your tools to prevent the transmission of pathogens. Well-maintained tools make the pruning process more efficient and reduce the risk of damaging the plant.
#### Pruning Techniques for Rosa Glauca
**Timing of Pruning**:
The timing of pruning is critical for the health and performance of Rosa glauca. The best time to prune is in late winter or early spring, just before the plant breaks dormancy. This timing allows you to remove any winter-damaged wood and shape the plant before new growth begins. Avoid heavy pruning in late summer or fall, as this can stimulate new growth that may not harden off before winter.
**Initial Pruning**:
When you first plant Rosa glauca, initial pruning is necessary to establish a strong framework. Remove any damaged or weak canes, and cut back the remaining canes by one-third to encourage branching. This initial pruning sets the stage for a well-structured and balanced shrub.
**Annual Pruning**:
Annual pruning is essential to maintain the health and shape of Rosa glauca. Follow these steps for effective annual pruning:
1. **Remove Dead, Diseased, or Damaged Wood**: Start by removing any canes that are dead, diseased, or damaged. Cut these canes back to healthy wood or to the base of the plant.
2. **Thin Out Canes**: To improve air circulation and light penetration, thin out the canes by removing the oldest and weakest stems. Aim to retain 5-7 of the healthiest and most vigorous canes.
3. **Shape the Plant**: Prune the remaining canes to shape the plant. Cut back long, leggy growth to encourage a more compact form. Make cuts just above an outward-facing bud to promote outward growth.
4. **Remove Suckers**: Remove any suckers that emerge from the base of the plant or from the rootstock. Suckers can drain energy from the main plant and disrupt its shape.
**Rejuvenation Pruning**:
Over time, Rosa glauca may become overgrown or unproductive. Rejuvenation pruning involves cutting the plant back severely to stimulate new growth. This can be done every 3-5 years to revitalize the shrub. Cut all canes back to a height of 12-18 inches (30-45 cm) from the ground. This drastic pruning encourages the development of new, vigorous canes and restores the plant’s vitality.
#### Shaping Techniques for Rosa Glauca
**Natural Shape**:
Rosa glauca has a naturally arching growth habit that can be enhanced through careful shaping. To maintain its natural form, focus on removing the oldest and most unproductive canes, while retaining the younger, more vigorous canes. This approach preserves the plant’s natural elegance and encourages a graceful, open structure.
**Formal Shape**:
For a more formal appearance, Rosa glauca can be shaped into a specific form, such as a hedge or a rounded shrub. Regular pruning is required to maintain the desired shape. Trim the outer edges of the plant to create a uniform appearance, and periodically thin out the interior canes to prevent overcrowding. Formal shaping requires more frequent maintenance but can create a striking and orderly display.
**Espalier**:
Espalier is a technique where plants are trained to grow flat against a wall or fence. While not commonly used for Rosa glauca, it can be an interesting way to display its unique foliage and flowers. To create an espalier, select a few strong canes and tie them horizontally along a support structure. Prune side shoots to maintain a flat, two-dimensional form. This technique requires regular pruning to maintain the shape but can create a visually appealing and space-saving display.
#### Common Pruning Mistakes and How to Avoid Them
**Over-Pruning**:
Over-pruning can weaken Rosa glauca and reduce its vigor. Avoid removing too much growth at once, as this can stress the plant and reduce flowering. Follow the general rule of not removing more than one-third of the plant’s total growth in a single pruning session.
**Improper Cutting Techniques**:
Making improper cuts can damage the plant and create entry points for diseases. Always make clean cuts just above an outward-facing bud or branch junction. Avoid leaving stubs, as they can become sites for infection. Use sharp, clean tools to ensure precise cuts and minimize damage.
**Ignoring Disease and Pest Issues**:
Failing to address disease and pest issues during pruning can lead to further problems. Inspect your plant carefully and remove any diseased or infested canes. Disinfect your tools between cuts to prevent the spread of pathogens. Regularly monitor your plant for signs of disease or pest activity and take appropriate action.
### Conclusion
Pruning and shaping Rosa glauca are essential practices for maintaining its health, beauty, and productivity. By understanding the plant’s growth habits, using the right tools, and following proper techniques, you can ensure that your Rosa glauca thrives in your garden. Whether you prefer a natural, formal, or espaliered form, regular pruning and shaping will enhance the plant’s aesthetic appeal and ecological benefits. In the next part of this guide, we will delve into advanced pruning techniques, troubleshooting common issues, and the role of Rosa glauca in landscape design. Stay tuned for more insights into mastering the art of pruning and shaping this unique and captivating rose species.
### Advanced Pruning and Shaping Techniques for Rosa Glauca (Part 2)
In the first part, we covered the basics of pruning and shaping Rosa glauca, including the importance of pruning, essential tools, and foundational techniques. This second part delves into advanced techniques, addressing specific scenarios, troubleshooting common issues, and discussing Rosa glauca’s role in landscape design. By mastering these advanced practices, you can ensure the optimal health and aesthetic appeal of your Rosa glauca shrubs.
#### Advanced Pruning Techniques
**Selective Pruning for Enhanced Blooming**:
To maximize the blooming potential of Rosa glauca, selective pruning is essential. Focus on removing the oldest, least productive canes, as they are less likely to produce abundant flowers. Instead, prioritize younger canes, which tend to be more vigorous and bloom more profusely. By thinning out the older canes and encouraging new growth, you can enhance the overall flowering capacity of the shrub.
1. **Identify and Remove Older Canes**: Look for canes that are older than three years, as these are generally less productive. Cut them back to the base of the plant to stimulate new growth.
2. **Encourage Young Canes**: Select 5-7 strong, young canes to keep, ensuring they are well-spaced and have room to grow. These canes will become the main framework of the plant, producing more flowers and hips.
**Pruning for Disease Management**:
Effective pruning can significantly reduce the incidence of diseases in Rosa glauca. Regularly inspect the plant for signs of disease, such as black spot, powdery mildew, or rust. Removing affected canes promptly can prevent the spread of these diseases and maintain the plant’s health.
1. **Remove Diseased Wood**: Cut back any canes showing signs of disease to healthy tissue, making the cuts well below the infected area.
2. **Sanitize Tools**: Disinfect your pruning tools between cuts with a solution of one part bleach to nine parts water to prevent the transmission of pathogens.
**Rejuvenation Pruning for Overgrown Shrubs**:
If Rosa glauca becomes overgrown or neglected, rejuvenation pruning can restore its vitality. This technique involves cutting the shrub back severely to encourage new growth.
1. **Timing**: Conduct rejuvenation pruning in late winter or early spring before new growth begins.
2. **Cutting Back**: Prune all canes back to a height of 12-18 inches (30-45 cm) from the ground. This drastic pruning stimulates the growth of new, vigorous canes and revitalizes the plant.
3. **Aftercare**: After rejuvenation pruning, apply a balanced fertilizer and mulch around the base of the plant to support new growth and retain moisture.
#### Troubleshooting Common Issues
**Dealing with Suckers**:
Suckers are shoots that emerge from the base of the plant or from the rootstock. They can drain energy from the main plant and disrupt its shape. Regularly removing suckers is essential for maintaining the health and appearance of Rosa glauca.
1. **Identification**: Suckers usually have different foliage and growth patterns compared to the main plant. They often emerge from below the graft union.
2. **Removal**: Remove suckers by cutting them as close to the base as possible. If they emerge from the rootstock, carefully dig down to the point of origin and remove them completely.
**Addressing Leggy Growth**:
Leggy growth occurs when the plant stretches towards light, resulting in long, spindly canes with fewer flowers. This can be caused by inadequate sunlight or overcrowding.
1. **Improving Light Exposure**: Ensure Rosa glauca receives at least 6 hours of direct sunlight daily. If necessary, relocate the plant to a sunnier spot.
2. **Thinning and Shaping**: Thin out the interior canes to improve light penetration and air circulation. Prune back leggy canes to an outward-facing bud to encourage more compact growth.
**Managing Pests and Diseases**:
Pests such as aphids, spider mites, and Japanese beetles can damage Rosa glauca. Regular inspection and prompt action are key to managing these issues.
1. **Regular Inspections**: Check the plant regularly for signs of pests and diseases. Look for discolored leaves, distorted growth, or visible insects.
2. **Natural Predators**: Encourage natural predators such as ladybugs and predatory wasps by planting companion plants that attract them.
3. **Organic Treatments**: Use organic treatments such as neem oil or insecticidal soap to control pest infestations. For fungal diseases, consider applying a fungicide or using a baking soda solution.
#### Shaping Techniques for Specific Landscapes
**Formal Hedges**:
Rosa glauca can be shaped into formal hedges, providing a structured and elegant look for garden borders or privacy screens.
1. **Initial Training**: When planting Rosa glauca for a hedge, space the plants 2-3 feet (60-90 cm) apart. During the first year, prune the tops of the plants to encourage bushier growth.
2. **Maintenance Pruning**: Trim the hedge regularly to maintain the desired height and shape. Use hedge trimmers to create a uniform surface, and thin out interior canes to prevent overcrowding.
**Espalier Techniques**:
Espaliering involves training plants to grow flat against a wall or fence, creating a decorative and space-saving display.
1. **Support Structure**: Install a sturdy support structure such as a trellis or wire frame against the wall or fence.
2. **Training Canes**: Select a few strong canes and tie them horizontally to the support structure. Prune side shoots to maintain a flat, two-dimensional form.
3. **Regular Pruning**: Prune regularly to maintain the shape and encourage lateral growth. Remove any shoots that grow away from the support structure.
**Cottage Garden Style**:
For a more informal, natural look, Rosa glauca can be incorporated into cottage gardens, where it can grow freely alongside other perennials and shrubs.
1. **Minimal Pruning**: Allow the plant to grow naturally, with minimal pruning to remove dead or diseased wood and to shape the plant as needed.
2. **Companion Planting**: Plant Rosa glauca alongside other cottage garden favorites such as lavender, delphiniums, and foxgloves. This creates a lush, layered effect that enhances the plant’s natural beauty.
#### Advanced Care Tips
**Fertilization**:
Rosa glauca benefits from regular fertilization to support its growth and flowering.
1. **Balanced Fertilizer**: Apply a balanced fertilizer in early spring, just as new growth begins. Follow the manufacturer’s instructions for application rates.
2. **Organic Amendments**: Incorporate organic amendments such as compost or well-rotted manure into the soil to improve fertility and soil structure.
**Mulching**:
Mulching helps retain soil moisture, suppress weeds, and regulate soil temperature.
1. **Mulch Application**: Apply a 2-3 inch (5-7 cm) layer of organic mulch, such as wood chips or straw, around the base of the plant. Keep the mulch a few inches away from the stems to prevent rot.
2. **Renewing Mulch**: Renew the mulch layer annually in spring to maintain its effectiveness.
**Watering**:
Proper watering is essential for the health of Rosa glauca, especially during dry periods.
1. **Deep Watering**: Water deeply and infrequently to encourage deep root growth. Avoid shallow, frequent watering, which can lead to surface roots and reduced drought tolerance.
2. **Watering Schedule**: During the growing season, water Rosa glauca when the top 2-3 inches (5-7 cm) of soil are dry. Reduce watering in late fall to prepare the plant for winter dormancy.
**Winter Protection**:
In colder climates, protecting Rosa glauca from harsh winter conditions can prevent damage and ensure healthy regrowth in spring.
1. **Mulch and Insulation**: Apply a thick layer of mulch around the base of the plant to insulate the roots. In particularly cold regions, consider using burlap or other protective covers to shield the plant from wind and frost.
2. **Pruning in Late Fall**: Lightly prune the plant in late fall to remove any damaged or weak growth. Avoid heavy pruning, as this can stimulate new growth that may not survive the winter.
#### Incorporating Rosa Glauca into Landscape Design
**Focal Points**:
Rosa glauca can serve as a stunning focal point in garden design, thanks to its distinctive foliage and flowers.
1. **Strategic Placement**: Position Rosa glauca in prominent locations where its unique attributes can be appreciated. This could be at the center of a flower bed, along a pathway, or near an entryway.
2. **Companion Plants**: Pair Rosa glauca with complementary plants that highlight its features. For example, plant it alongside grasses or perennials with contrasting textures and colors.
**Mixed Borders**:
In mixed borders, Rosa glauca adds height, color, and seasonal interest.
1. **Layered Planting**: Use Rosa glauca as a backdrop for shorter plants, creating a layered effect that adds depth and dimension to the border.
2. **Seasonal Interest**: Combine Rosa glauca with plants that provide interest throughout the seasons, ensuring a continuously vibrant and dynamic display.